Haremos uso del módulo RTC con el que cuenta el MCU R5F104PJAFB de la tarjeta de evaluación YRDKRL78G14. Imprimiremos la fecha y hora en la LCD gráfica.
- Configuraremos el RTC con oscilador externo
- Estableceremos una fecha y hora
- Se imprimirá en tiempo real la fecha y hora en la LCD
DESARROLLO:
- Del YRDKRL78G14 schematic verificamos que posee el oscilador externo 32.768 Khz


- Del documento Renesas RL78G14 RDK User's Manual confirmamos dicho oscilador.


- Creación de un proyecto:
2.- New/ C Project

- Configurar proyecto:

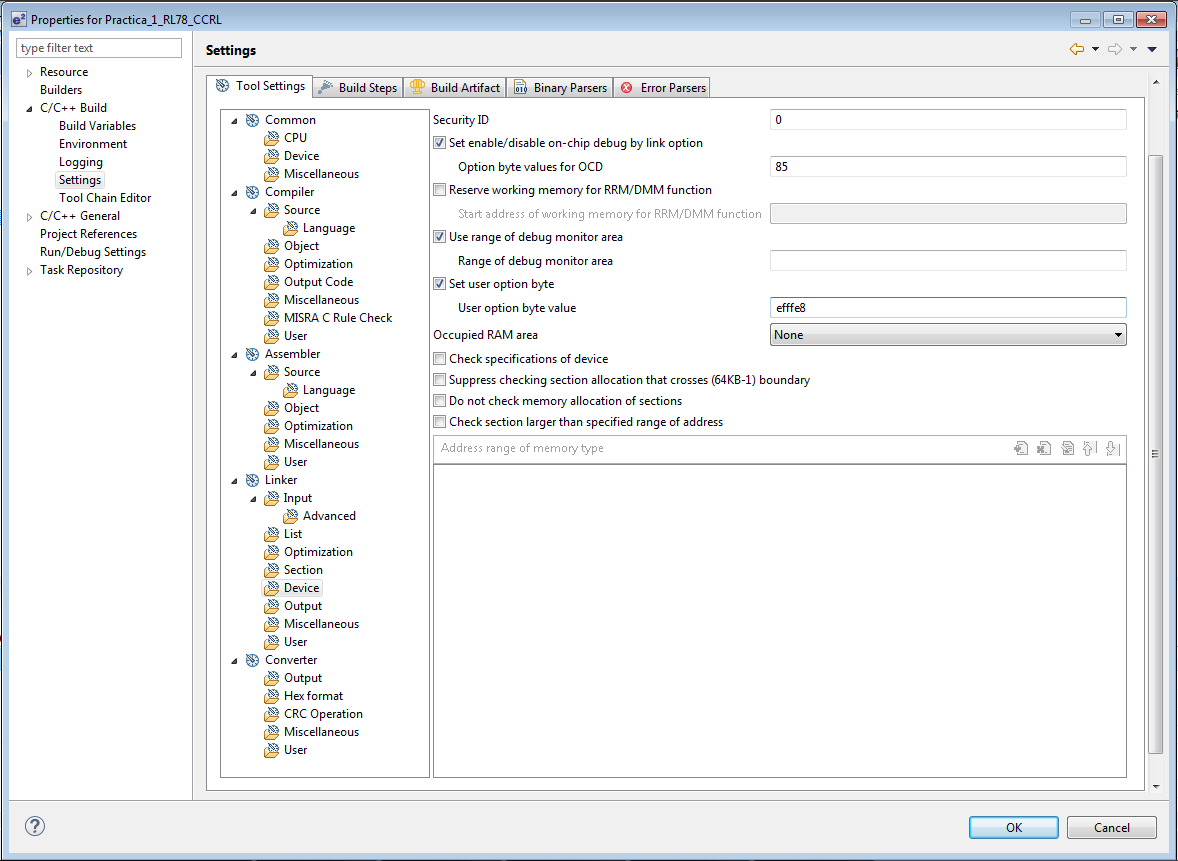
2.- Seleccionar C/C++ Build / Settings / Linker / Device y establecer los siguientes parámetros:
OCD = 85
Option Byte = efffe8
Palomear: Use range of debug monitor area. Nota: No establecer ningún valor solo dejarlo en blanco.
Apply y después OK.
3.- La inicialización del RTC se muestra en el archivo rtc.c:
void RTC_Init(void)
{
RTCEN
= 1U; /* supply RTC clock
*/
RTCE
= 0U; /* disable RTC
clock operation */
RTCMK = 1U; /* disable INTRTC interrupt */
RTCIF = 0U; /* clear INTRTC interrupt flag */
/* Set INTRTC low priority */
RTCPR1
= 1U;
RTCPR0
= 1U;
RTCC0
= _00_RTC_RTC1HZ_DISABLE | _08_RTC_24HOUR_SYSTEM
|
_02_RTC_INTRTC_CLOCK_1;
/* Set real-time clock */
SEC
= _53_RTC_COUNTER_SEC;
MIN
= _59_RTC_COUNTER_MIN;
HOUR
= _23_RTC_COUNTER_HOUR;
WEEK
= _04_RTC_COUNTER_WEEK;
DAY
= _26_RTC_COUNTER_DAY;
MONTH
= _01_RTC_COUNTER_MONTH;
YEAR
= _17_RTC_COUNTER_YEAR;
// START
RTCIF
= 0U; /* clear INTRTC
interrupt flag */
RTCMK = 0U; /* enable INTRTC interrupt */
RTCE = 1U; /* enable RTC clock operation */
}
void get_RTC(void)
{
int w_count;
RTCC1
|= _01_RTC_COUNTER_PAUSE;
/* Change the waiting time according to
the system */
for (w_count = 0U; w_count < RTC_WAITTIME;
w_count++)
{
__nop();
}
year10
= YEAR;
month10
= MONTH;
day10
= DAY;
hour10
= HOUR;
min10
= MIN;
sec10
= SEC;
if ((hour10 >= 0x12) && (hour10
<= 0x23))
{
pm
= 1;
}
else
{
pm
= 0;
}
RTCC1
&= (uint8_t) ~_01_RTC_COUNTER_PAUSE;
/* Change the waiting time according to
the system */
for (w_count = 0U; w_count < RTC_WAITTIME;
w_count++)
{
__nop();
}
}
7.- La función main queda de la siguiente forma:
void main(void)
{
__EI();
SR_Oscilador(); // configura
las frecuencias 32 Mhz cpu y Fsub a 32.768 khz
SR_LCD_GRAPH(); // LCD 96x64
SR_INTERVAL_TIMER(); // configura las frecuencia
Fsub = 32.768 khz para IT y acceder a los
delay_ms y delay_100us
SR_RTC(); // Configura
Reloj de tiempo real
while(1)
{
if(fRun)
{
sprintf((char *) line1, " %x-%x-20%x", day10, month10, year10);
sprintf((char *) line2, " %x:%x:%x %s", hour10, min10, sec10, g[pm]);
LCDPrintf(7,
0, " ");
LCDPrintf(0,
0, "Microcarsil
");
LCDPrintf(1,
0, " 2017
");
LCDPrintf(2,
0, "Carlos
Silva");
LCDPrintf(3,
0, " ");
LCDPrintf(4,
0, "Practica
#16");
LCDPrintf(5,
0, " ");
LCDPrintf(6,
0, "%s", line1);
LCDPrintf(7, 0, "%s", line2);
fRun = 0;
}
}
}
- Agregar código, compilar y debug:

VÍDEO:
No hay comentarios.:
Publicar un comentario